|
 Billing Billing 
Click the Billing Icon 
Click the Billing Button 
The Quixote Billing window opens:

How to Bill HCFAs (Insurance)
Click the Create Bills Button: 
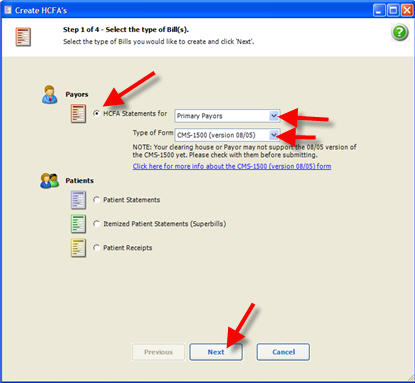
Select Payors and select who the HCFA Statements are for:
- Primary Payors
- Secondary Payors
- Tertiary Payors

 Note: If you are billing primary insurance select Primary Payors (the default). Select which HCFA form Note: If you are billing primary insurance select Primary Payors (the default). Select which HCFA form
Click the Next Button
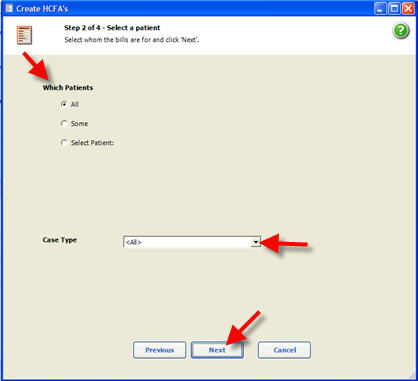
Select Which Patients to bill HCFAs for
All: All Patients
Some: Select from drop down which patients to bill HCFAs for
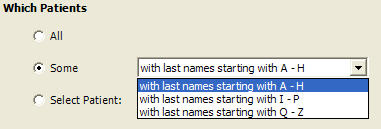
Select Patient: Select a specific Patient to bill HCFAs for
- Click Select Patient
- Click the Select Button
- The Patient Rolodex will Open
- Select the Patient

 Note: You can bill specific patient's from the patient file, Bills Tab. Note: You can bill specific patient's from the patient file, Bills Tab.
Case Type: Select the Case Type for the drop down list. Quixote defaults to ALL, which is the normal selection unless you are billing a specific Case Type. i.e. Medicare, Workers Comp., etc.
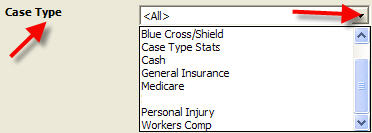
Click the Next button.
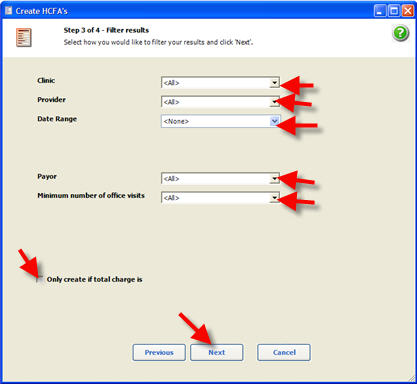
Clinic: Select from the Clinic drop down list to bill HCFAs for a specific clinic. Quixote defaults to ALL.
Provider: Select from the Provider drop down list to bill HCFAs for a specific Provider. Quixote defaults to ALL. Date Range: Select from the Date Range drop down list to bill HCFAs for a specific Date Range. Quixote defaults to ALL. Payor: Select from the Payor drop down list to bill HCFAs for a specific Payor. Quixote defaults to ALL. Minimum number of office visits: Select from the Minimum number of office visits drop down list to bill HCFAs for a specific minimum number of office visits. Quixote defaults to ALL. Only create if total charge is: Check the box next to "Only create if total charge" and select from the drop down list:
- Greater than
- Less than
- Between
and enter a dollar amount to bill HCFAs for specific dollar amounts. Quixote defaults to unchecked.

 Quixote is designed to bill all unbilled charges. Setting any of the above options, could cause unbilled charges to get missed during the billing. If is recommended to leave the default settings for normal billing and use the options only for specific billing. Quixote is designed to bill all unbilled charges. Setting any of the above options, could cause unbilled charges to get missed during the billing. If is recommended to leave the default settings for normal billing and use the options only for specific billing.
Click the Next button. 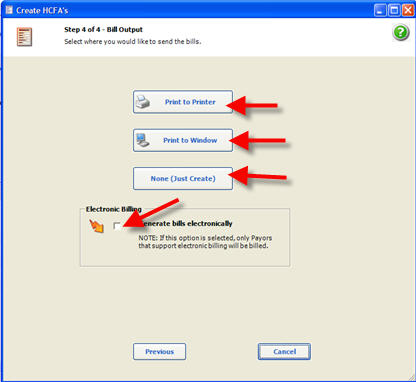
Click the:
Print to Printer: Will Print HCFA's to the Printer
Print to Window: Will Print HCFA's to the Window
None (Just Create): Will not Print to the Printer or the Window, will just create the bills (possibly to print later)
Electronic Billing: Check the Electronic Billing Box and Proceed to the Next window if you are processing claims electronically.
 Note: To Print Claims and submit claims electronically simoultaneously, click the Electronic Billing box. Note: To Print Claims and submit claims electronically simoultaneously, click the Electronic Billing box.
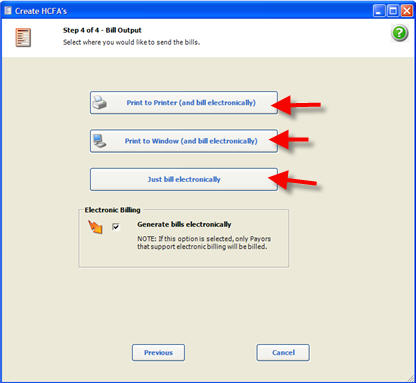
Print to Printer (and bill electronically): To Print Claims and submit claims electronically simoultaneously! Print to Window (and bill electronically): Will Print Electronic Claims (HCFA's) to the Window Just bill electronically: Will not Print to the Printer or the Window, will just create the electronic bills Return to Billing Return to Reference Guide How Print Itemized Statements 
Click the Billing Icon 
Click the Billing Button 
The Quixote Billing window opens:

Click the Create Bills Button: 
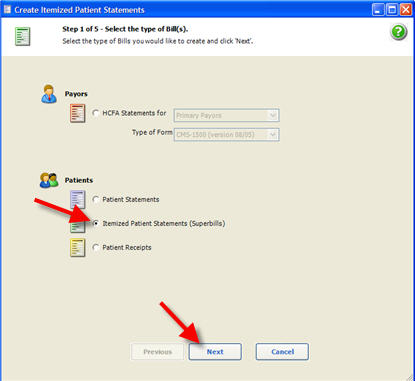
Select Itemized Patient Statements (Superbills)
Click the Next button 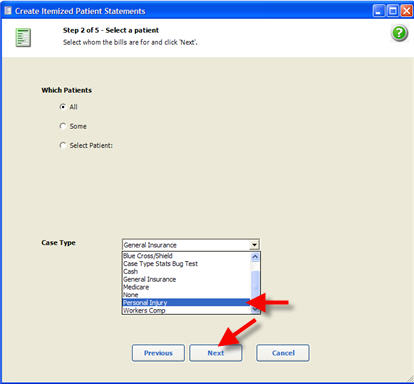
Select Which Patients to Print Patient Itemized Statements (Superbills) for
All: All Patients
Some: Select from drop down which patients to bill HCFAs for

Select Patient: Select a specific Patient to print a Patient Itemized Statements (Superbills) for - Click Select Patient
- Click the Select Button
- The Patient Rolodex will Open
- Select the Patient

 Note: You can bill specific patient's from the patient file, Bills Tab. Note: You can bill specific patient's from the patient file, Bills Tab.
Case Type:
Select the Case Type for the drop down list. Quixote defaults to ALL,
which is the normal selection unless you are billing a specific Case
Type. i.e. Medicare, Workers Comp., etc.
 Note: Print Attorney statements by selecting Case Type - Personal Injury Note: Print Attorney statements by selecting Case Type - Personal Injury

Click the Next button.
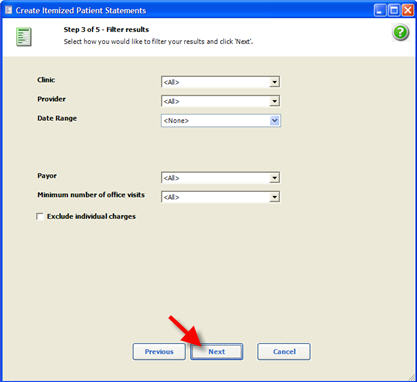
Clinic: Select from the Clinic drop down list to bill Patient Itemized Statements (Superbills) for a specific clinic. Quixote defaults to ALL.
Provider: Select from the Provider drop down list to bill Patient Itemized Statements (Superbills) for a specific Provider. Quixote defaults to ALL. Date Range: Select from the Date Range drop down list to bill Patient Itemized Statements (Superbills) for a specific Date Range. Quixote defaults to None. Payor: Select from the Payor drop down list to bill Patient Itemized Statements (Superbills) for a specific Payor. Quixote defaults to ALL. Minimum number of office visits:
Select from the Minimum number of office visits drop down list to bill
Patient Itemized Statements (Superbills) for a specific minimum number of office visits. Quixote defaults
to ALL. Exclude individual charges: Check the box next to "Only create if total charge" and select from the drop down list:
- Greater than
- Less than
- Between
and enter a dollar amount to bill Patient Itemized Statements (Superbills) for specific dollar amounts. Quixote defaults to unchecked.

Click the Next button. 
This window allows the user to customize how the Itemized Patient Statement (Superbills) will look before printing. Make your selections based on who will be receiving the Itemized Patient Statement (Superbills). Insured's Information: If checked, will Include the Insured's Information on the Itemized Patient Statement (Superbills). Attorney's Information: If checked, will Include the Attorney's Information on the Itemized Patient Statement (Superbills). Doctor's TaxID Number: If checked, will Include the Doctor's Tax ID Number on the Itemized Patient Statement (Superbills). Diagnosis: If checked, will Include the Insured's Diagnosis, including ICDs on the Itemized Patient Statement (Superbills). Charges:
- with CPT Codes: If checked, will Include the CPT Codes on the Itemized Patient Statement (Superbills).
- with Breakdown: If checked, will Include breakdown Information on the Itemized Patient Statement (Superbills).
- with Modifiers: If checked, will Include the Modifier's on the Itemized Patient Statement (Superbills).
- with Contract w/o: If checked, will Include the Contract write off amounts on the Itemized Patient Statement (Superbills).
Detailed Summary Drop Down List:
No Summary: If checked, will not Include a Summary on the Insured's Information on the Itemized Patient Statement (Superbills). Mini Summary: If checked, will Include a Mini Summary on the Insured's Information on the Itemized Patient Statement (Superbills). Detailed Summary: If checked, will Include a Detailed Summary on the Insured's Information on the Itemized Patient Statement (Superbills).
 Example for an Attorney Statement Example for an Attorney Statement


|