|
 Appointments Tab Appointments Tab 
 Note: Appointments should be added from the Appointments window. (Click the Appointments Icon) Note: Appointments should be added from the Appointments window. (Click the Appointments Icon)
Click the Patient Icon 
Open Patient
Click the Appointments Tab  
List of Appointments Tab
Scheduled and Current Appointments: Displays all future appointments for this patient, this case.
Appointment History: Displays the appointment history for this patient, this case.
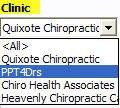
Clinic: Select the Clinic from the Clinic drop down to display appointments for a specific clinic.
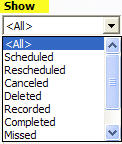
Show: - All: Quixote defaults to All, this displays All Appointments
- Scheduled: Select Scheduled to only display Appointments with a Scheduled status.
- Rescheduled: Select Rescheduled to only display Appointments with a Rescheduled status.
 Note: Rescheduled means the appointment was rescheduled prior to the schedule appointment time. (before it turned to a Missed status) Note: Rescheduled means the appointment was rescheduled prior to the schedule appointment time. (before it turned to a Missed status)
- Canceled: Select Canceled to only display Appointments with a Canceled status.
Note: Canceled means the appointment was canceled prior to the schedule appointment time. (before it turned to a Missed status) - Deleted: Select Deleted to only display Appointments with a Deleted status.
- Recorded: Select Recorded to only display Appointments with a Recorded status.
- Completed: Select Completed to only display Appointments with a Completed status.
- Missed: Select Missed to only display Appointments with a Missed status.
- Missed and Canceled: Select Missed and Canceled to only display Appointments with a Missed and Canceled status.
Note: Missed and Canceled means the appointment was Missed and then canceled.
- Missed and Rescheduled: Select Missed and Rescheduled to only display Appointments with a Missed and Rescheduled status.
Note: Missed and Rescheduled means the appointment was Missed and then Rescheduled. (Staff is doing a good job getting missed appointments rescheduled.)
Options: Clicking any where in the Appointment History will activate the following appointment buttons:

Tooltips: Check Tooltips and hover over any appointment to see details about the appointment.

 Tip: Click column heading to sort selected column. Tip: Click column heading to sort selected column.
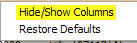
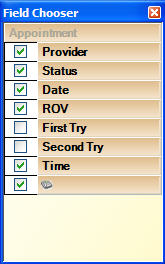
Hide / Display Options: Right click and select Hide / Show Columns
Select which columns you would like to Hide (uncheck) or Show (check)
Reference Guide

New: Click the New Button to schedule a New appointment for this patient, this case. Note: Appointments are usually scheduled through the Appointments / Workflow window.
Reschedule: Highlight appointment and click the Reschedule Button to reschedule an appointment for this patient, this case. Note: Appointments are usually rescheduled through the Appointments / Workflow window. Cancel: Highlight appointment and click the Cancel Button to cancel an appointment for this patient, this case. Note: Appointments are usually canceled through the Appointments / Workflow window. Delete: Highlight appointment and click the Delete Button to delete an appointment for this patient, this case. Note: Appointments are usually canceled through the Appointments / Workflow window. Review: Highlight appointment and click the Review Button to review details for an appointment for this patient, this case. Q-mmunicate Status: Highlight appointment and click the Q-mmunicate Status Button to view the Q-mmunicate status for an appointment for this patient, this case. (Q-mmunicate is an optional appointment reminder service.)
Reference Guide Print: Click the Print button to select from drop down printing options

Cases & Policies: Select Cases & Polices to print or view a Cases Report

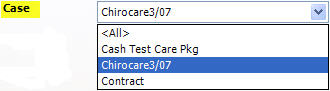
- Cases: Select Case from drop down to View/Print Case Report for a specific Case.
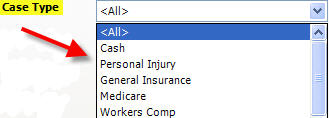
- Case Type: Select Case Type from drop down to View/Print Case Report for a specific Case Type.
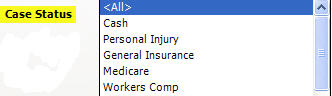
- Case Status: Select Case Status from drop down to View/Print Case Report for a specific Case Status.
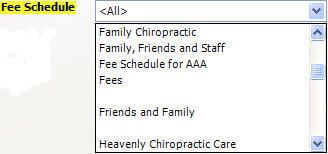
- Fee Schedule: Select Fee Schedule from drop down to View/Print Case Report for a specific Fee Schedule.
- Balance: Select Min and enter Minimum Amount and/or Max and enter Maximum Amount to View/Print Cases Report with specific balances.

- Credits: Select Min and enter Minimum Amount and/or Max and enter Maximum Amount to View/Print Cases Report with specific credits amounts.

- Wrap Text if truncated (makes report longer): Check Wrap Text if truncated to Wrap text. Note: Creates longer report.
- Include Phone Numbers: Check Include Phone Numbers to View/Print Case Report with Phone Numbers
- Show Policies for each Case (with Balance breakdown): Check Show Policies for each Case (with Balance breakdown) to View/Print Case Report with Policies and balance breakdowns.
- Include deleted Policies: Check Include deleted Policies to View/Print Case Report with deleted Policies included.
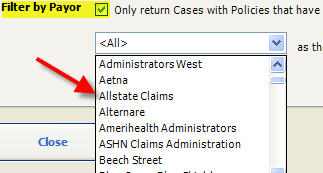
- Filter by Payor: Select Filter by payor from drop down to View/Print Case Report for a specific Payor.
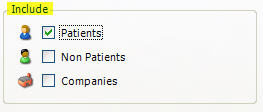
- Include:
- Patients: Select Patients to View/Print Case Report for Patients.
- Non Patients: Select Non Patients to View/Print Case Report for Non Patients.
- Companies: Select Companies to View/Print Case Report for Companies.
![Appointment Tab Print Cases Bil
</td></tr>
<tr><td colspan=2> </td></tr>
<tr><td colspan=2> <hr /> </td></tr>
<tr><td class=]() Related Articles:
Related Articles:
No related articles.
| 